The Unifi Protect Event Manager is a Flask-based service that integrates with UniFi Protect to manage and trigger video exports based on events like motion detection or doorbell rings. It allows for controlling video recording events by specifying past and future times and filtering cameras.
Github location here: https://github.com/lux4rd0/unifi-protect-event-manager
Features
- Event Management: Start, extend, or cancel video recording events.
- Multiple Camera Support: Trigger events for one or multiple cameras.
- Flexible Timing: Configure how far back and how far into the future to record.
- Status Logging: This function periodically logs the status of active events, providing the remaining time, start/end times, and involved cameras.
- Home Assistant Integration: Easily trigger events from Home Assistant automation.
- Dockerized Deployment: Easily deploy via Docker Compose.
Table of Contents
How it Works
The service runs as a Flask web app, exposing several API endpoints to manage events. Events represent time periods during which video footage from one or more UniFi cameras is exported. These events can be started, extended, or canceled.
Each event has a start time, an end time, a list of cameras, and an associated identifier. Events can be managed via the following operations:
- Start/Extend Event: Create or extend an event by specifying how many minutes in the past and future to record.
- Cancel Event: Cancel a running event before it completes.
- View Status: View the status of all running events, including remaining time, start/end time, and cameras.
The system is designed to periodically log the current status of active events and automatically delete them once they are complete.
Video Export Using Protect-Archiver
This project integrates with unifitoolbox/protect-archiver, a command-line utility for managing UniFi Protect recordings. Protect-archiver enables seamless downloading, listing, and deleting video footage from UniFi Protect systems.
How Protect-Archiver is Used in This Project
By leveraging protect-archiver, this service automates the video export process when events are triggered via the API. Here’s how it works:
- Event Handling: When an event is started or extended through the API, the system calculates the appropriate start and end times for the video export.
- Dynamic Command Construction: Based on the event details, the system constructs a protect-archiver command to export video footage. This includes defining the time range and selecting the cameras involved.
- Background Execution: The service executes the protect-archiver command in the background, ensuring the video is downloaded to a specified output folder.
- Camera Selection: Users can specify which cameras to include in the export. The system defaults to exporting footage from all cameras if no cameras are provided.
Example Command
Here’s an example of a protect-archiver command dynamically generated by the system for video export:
protect-archiver download \
  --address <UNIFI_PROTECT_ADDRESS> \
  --username <UNIFI_PROTECT_USERNAME> \
  --password <UNIFI_PROTECT_PASSWORD> \
  --start <start_time> \
  --end <end_time> \
  --cameras=<cameras> \
  --no-use-subfolders <output_folder>
<UNIFI_PROTECT_ADDRESS>: The IP or domain of your UniFi Protect system.<start_time>and<end_time>: Time range for the export, calculated dynamically based on the event.<cameras>: A list of camera IDs to include in the export. If not specified, all cameras will be included.<output_folder>: The folder where the exported footage is saved.
Why Protect-Archiver?
Using protect-archiver allows this service to streamline interactions with UniFi Protect, making it easy to manage video exports with precise control over time periods and cameras. Whether for security, event monitoring, or archival purposes, this integration automates the process and simplifies video management.
For more details on protect-archiver, visit the official GitHub repository.
Deployment
Docker Compose
You can use the following Docker Compose setup to deploy this service via Docker.
- Create a
docker-compose.ymlfile with the following contents:
name: unifi-protect-event-handler
services:
  unifi-protect-event-handler:
    container_name: unifi-protect-event-handler
    environment:
      UPEM_DEFAULT_FUTURE_MINUTES: "5"
      UPEM_DEFAULT_PAST_MINUTES: "5"
      UPEM_TZ: America/Chicago
      UPEM_UNIFI_PROTECT_ADDRESS: unifi01.lux4rd0.com
      UPEM_UNIFI_PROTECT_PASSWORD: PASSWORD
      UPEM_UNIFI_PROTECT_USERNAME: protect-archiver
      UPEM_LOG_INTERVAL: 5
    ports:
      - mode: ingress
        target: 8888
        published: "8888"
        protocol: tcp
    volumes:
      - type: bind
        source: /video/unifi-protect-event-handler
        target: /app/downloads
        bind:
          create_host_path: true
    image: lux4rd0/unifi-protect-event-manager:latest
- Run
docker compose up -dto start the service.
Environment Variables
TZ: Timezone setting (defaults to UTC if not set).UPEM_UNIFI_PROTECT_ADDRESS: Address of your UniFi Protect instance.UPEM_UNIFI_PROTECT_USERNAME: Username for accessing UniFi Protect.UPEM_UNIFI_PROTECT_PASSWORD: Password for accessing UniFi Protect.UPEM_DEFAULT_PAST_MINUTES: Default time in minutes to record from the past.UPEM_DEFAULT_FUTURE_MINUTES: Default time in minutes to record into the future.UPEM_LOG_INTERVAL: Interval in seconds when the system logs active event status.UPEM_MAX_RETRIES: Maximum number of retry attempts for failed exports.UPEM_RETRY_DELAY: Delay in seconds between retry attempts for failed exports.
Home Assistant Integration
This system can be easily integrated into Home Assistant to trigger video exports based on motion or other triggers.
REST Command
In Home Assistant, set up a REST command to trigger UniFi Protect Event Manager events.
- Add the following to your
configuration.yaml:
rest_command:
  start_unifi_protect_event:
    url: "http://<server_ip>:8888"
    method: POST
    headers:
      content-type: "application/json"
    payload: >
      {
        "identifier": "{{ identifier }}",
        "past_minutes": {{ past_minutes }},
        "future_minutes": {{ future_minutes }},
        "cameras": [ {% for camera in cameras %} "{{ camera }}"{% if not loop.last %}, {% endif %}{% endfor %} ]
      }
Automation Example
You can trigger the REST command in an automation based on motion or other sensors:
alias: Trigger Video Export on Motion
trigger:
  - platform: state
    entity_id: binary_sensor.front_door_motion
    to: 'on'
action:
  - service: rest_command.start_unifi_protect_event
    data:
      identifier: "front_door_motion"
      past_minutes: 5
      future_minutes: 5
      cameras:
        - 65eb91b702d34c03e40316c2
This automation starts an event to export video footage from the past 5 minutes and future 5 minutes when motion is detected.
API Endpoints
Here are the key API endpoints available in the UniFi Protect Event Manager:
- Start Event
- Endpoint:
/start - Method:
POST - Payload Example:
{
  "identifier": "door1",
  "past_minutes": 5,
  "future_minutes": 10,
  "cameras": ["camera_id_1", "camera_id_2"]
}
- Endpoint:
- Cancel Event
- Endpoint:
/cancel - Method:
POST - Payload Example:
{
  "identifier": "door1"
}
- Endpoint:
- Event Status
- Endpoint:
/status - Method:
GET - Query Parameter:
identifier=<event_identifier> - Example:
/status?identifier=door1
- Endpoint:
Web Interface Overview
This service provides a simple web interface accessible by default on port 8888. The web interface lets users easily manage video recording events from their UniFi Protect cameras. Once deployed, you can access the interface by navigating to:
http://<server_ip>:8888/
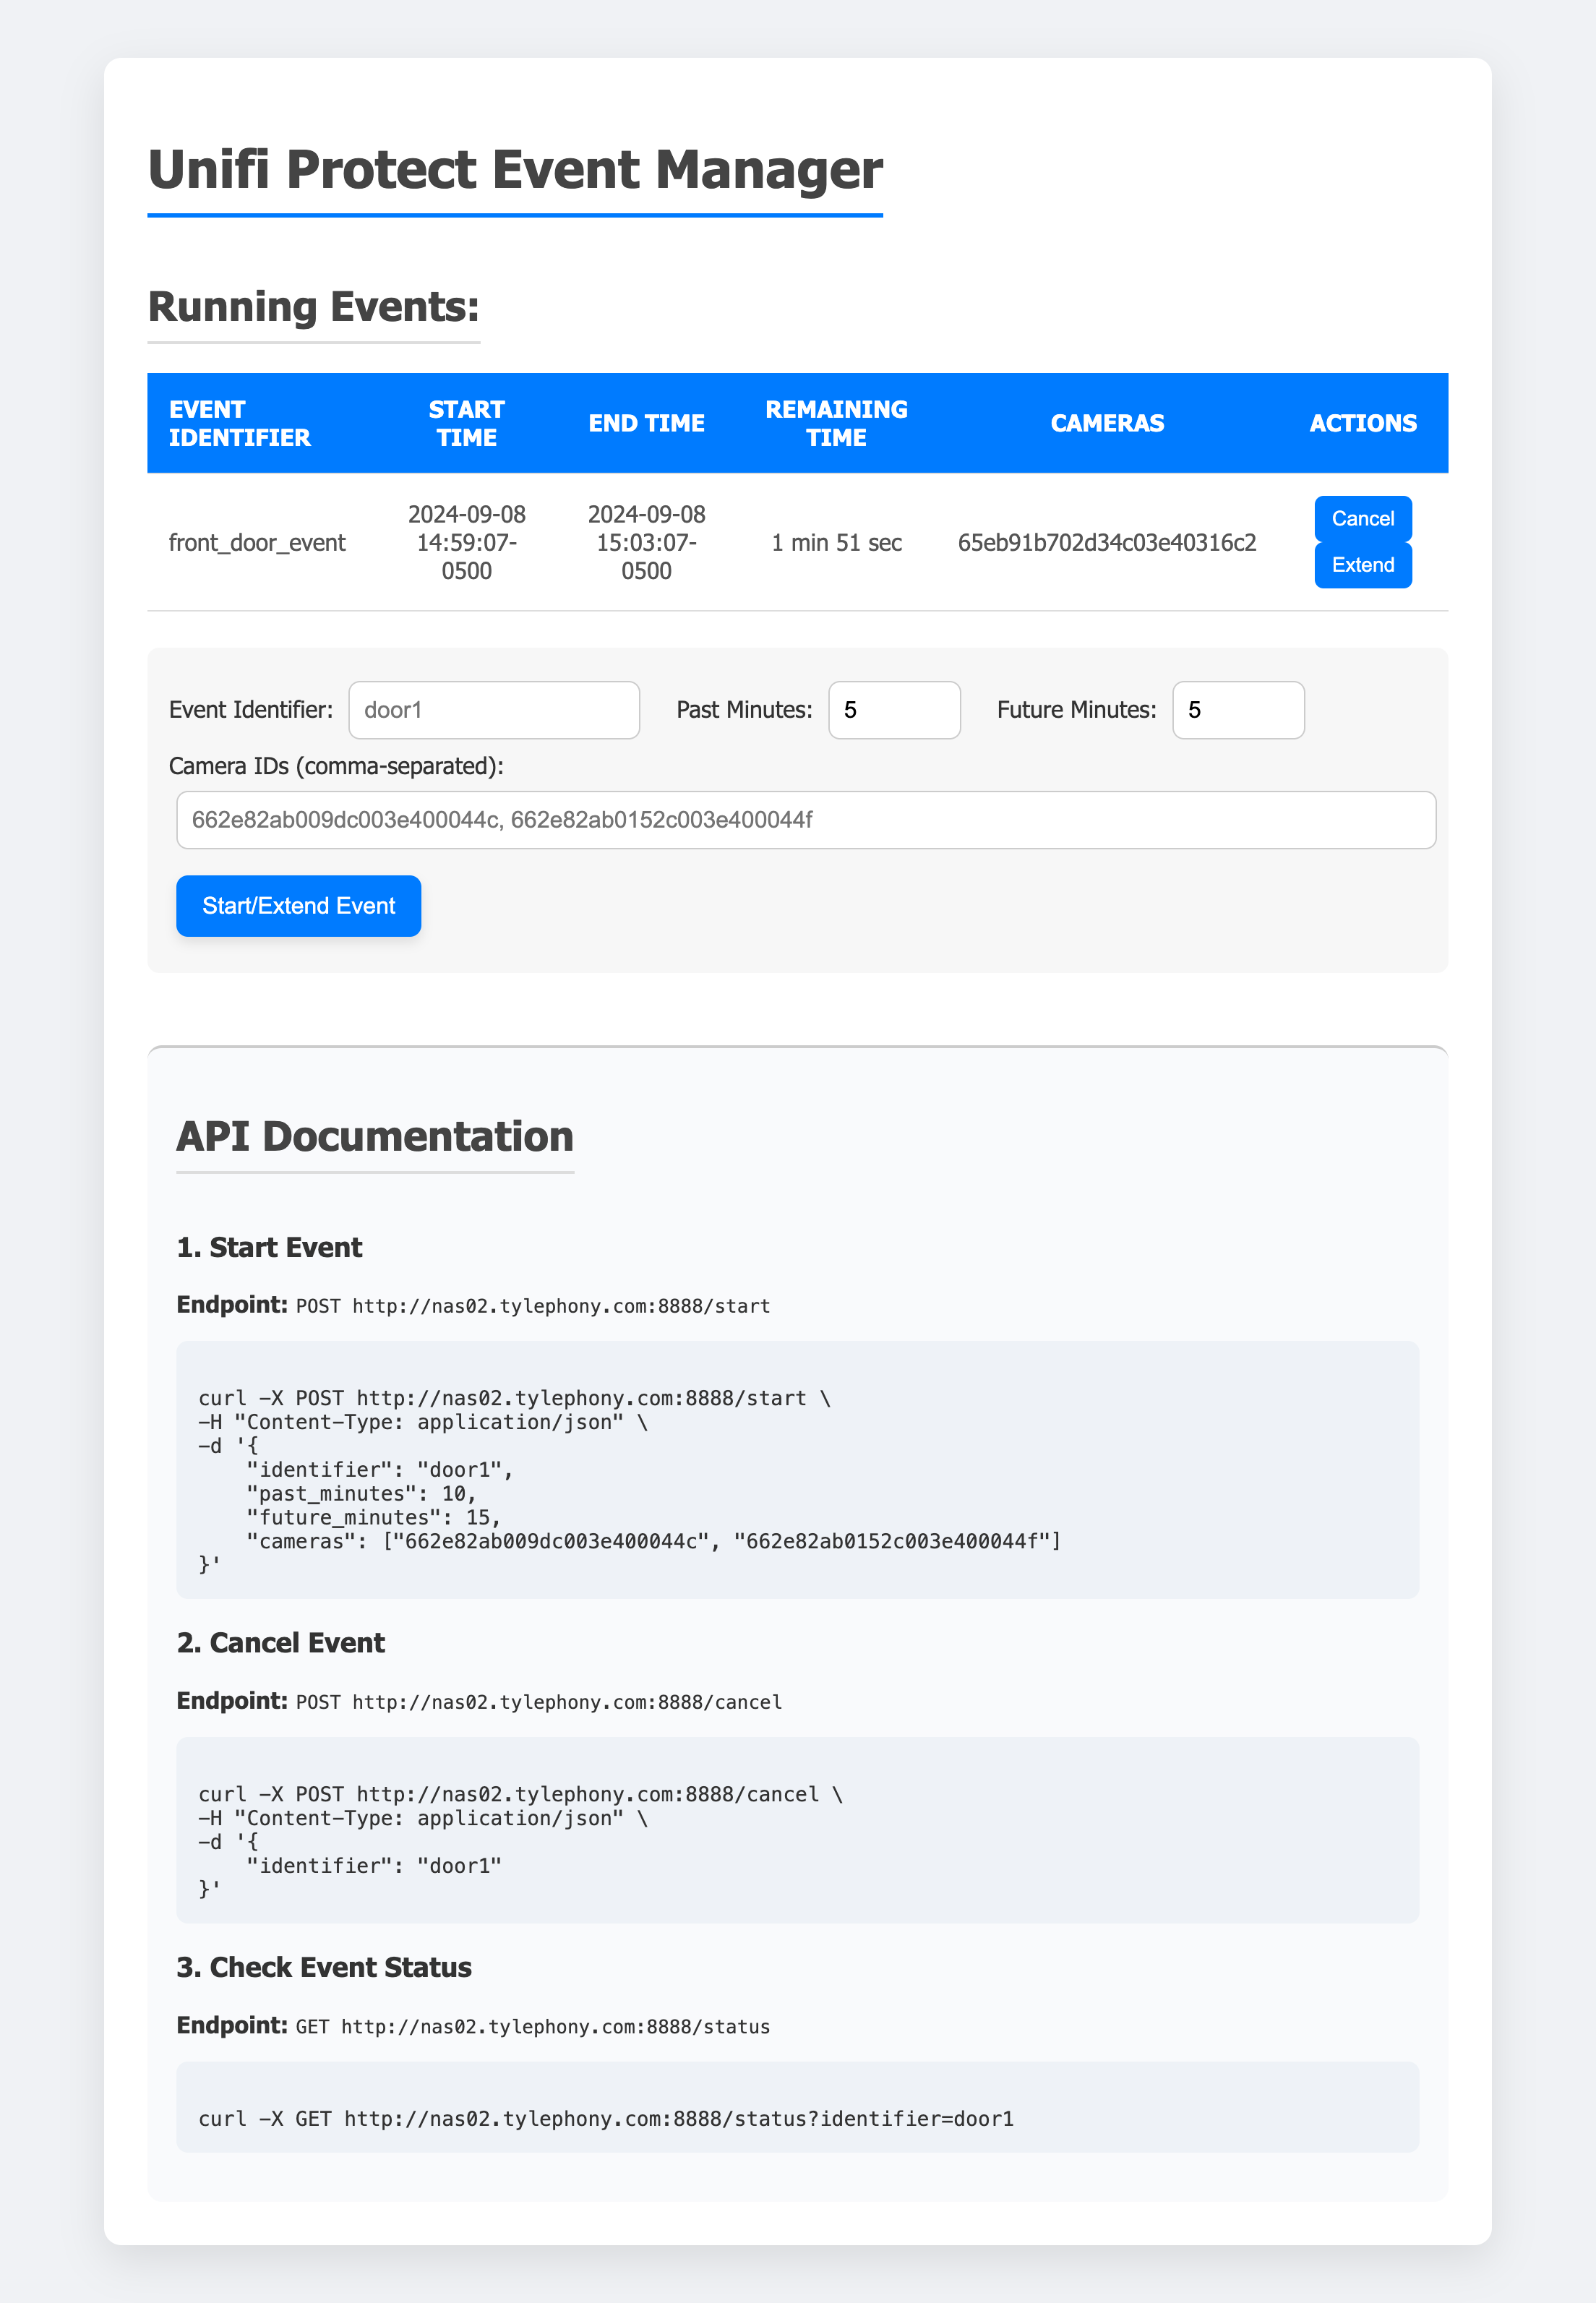
Home Page (index.html)
The home page provides an intuitive interface for starting, extending, and canceling video recording events. Here’s a breakdown of the different sections and functionality available:
Running Events Table
- Event Identifier: A unique identifier for each event, either auto-generated or user-provided.
- Start Time: The time when the event was started.
- End Time: The time when the event will end.
- Remaining Time: The time remaining before the event completes.
- Cameras: This field lists the camera IDs involved in the event. If no specific cameras are provided, “All Cameras” is displayed.
- Actions: Two buttons allow you to Extend or Cancel an event. When extended, the event continues recording for the minutes specified in the
Future Minutesfield.
Controls Section
This section allows you to create or extend a recording event for specific cameras.
- Event Identifier: A text input where you can specify a unique identifier for your event.
- Past Minutes: Input the number of minutes in the past that should be included in the recording. This is useful for capturing footage just before the event is triggered.
- Future Minutes: Input the number of minutes in the future that the recording should continue.
- Camera IDs: Optionally, specify a comma-separated list of camera IDs. If no cameras are specified, all available cameras will be used.
Buttons:
- Start/Extend Event: This function starts a new event or extends an existing one with the specified identifier, past, and future minutes.
- Cancel Event: Cancels the event with the provided identifier.
API Documentation
The web interface also provides examples of how to use the exposed API endpoints with curl. You’ll find this documentation at the bottom of the page, making it easy for users to interact with the service programmatically. The available examples include:
- Start Event
- Cancel Event
- Check Event Status
You can modify these examples to match your specific setup by changing the identifiers, cameras, and time intervals.